
|
|
|
|
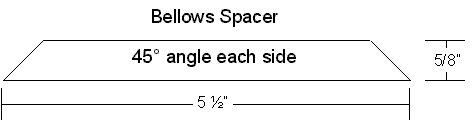
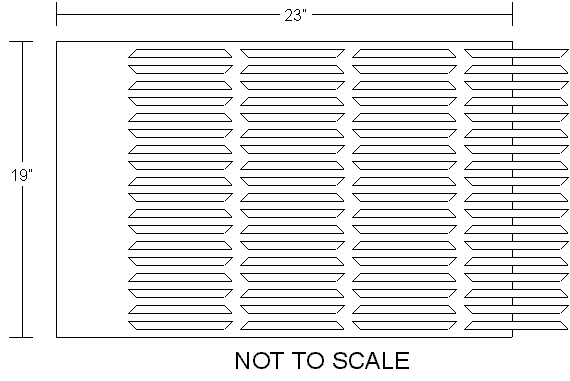
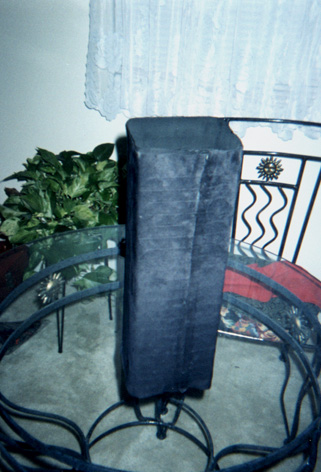
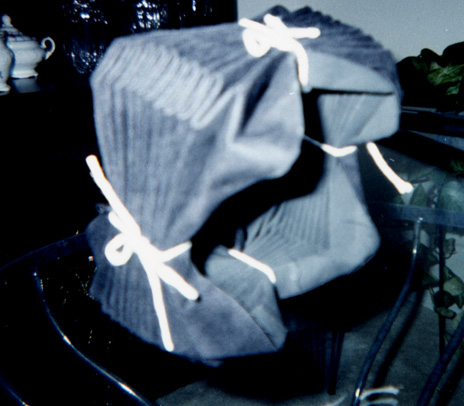
Bellows The bellows were a little easier than I anticipated but, even so, it took three tries to get it right. First, decide on the cloth you are going to use. I used a thin plastic coated cloth that cost me about five dollars for a yard for the first two but found a wonderful cloth for the third. It's a micro-fiber polyester that was made to imitate suede. It looks really nice as a bellows and is light proof, thin and easy to work with (I tested it in a light proof room with a high power flashlight pressed against the cloth and I had to check and make sure the flashlight was on. No light leak at all.) It was a little more expensive, $16.99 a yard, but well worth the cost. The material is called Micro-Suede and it is available in several colors including black. Hancock Fabric's (where I found it) SKU# is 102178 but it doesn't look like it is a regularly stocked item. Hancock couldn't give me a manufacture on this stuff. It is actually a knock off of a product called Ultra-Suede but the cost on that stuff is $30-$50 a yard (depending on sales) and this stuff is much thicker. There are several ways you can get the material. You can try their website, www.hancockfabrics.com, however I'm told this item is not online so you would have to email the website folks and see if you can get it. You can call or write the Hancock store here in Colorado Springs and ask for Jan and she will help you out. Their phone number is 719-598-4994 and the address is 3650 Austin Bluffs Pkwy, Colorado Springs, CO, 80918. Finally, if all else fails, send me an email and I'll see what I can do for you. A yard of material gave me about two bellows. The first things that you have to decide is the length you want your bellows. Mine is 17" so I added 2" (an inch either end) to the total length of the cloth for a total of 19". Then find out how large of a square you need to fit the final internal dimensions of your camera. Keep in mind what kind of frame you are going to build as well and figure that into your measurements. More on that at the bottom of this page. Mine was about 5 1/2" a side. Add each side together, in this case it equals 22", but make sure you add an inch for finish for a total of 23" total width. Now you have your cloth cut and ready. Next, get some black construction paper from a craft store (the fabric store had what I needed). You need it to be thick enough for stability but not too thick to be bulky. Cut out pieces that are 5 1/2" long by 5/8" wide. Then cut a 45° angle on both sides. Cut enough to do the project plus some just in case. I think my count was right at 200. I used the paper cutter I was using for my print paper and cut the angles by taping a straight edge with a 45° angle on it to the cutting board. Worked great.
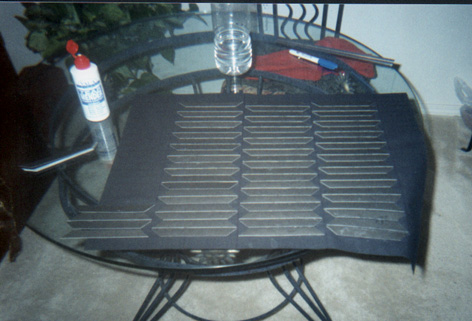
Now comes the fun part. Glue each spacer onto the cloth with a half inch separating them. Start the first row in from the edge by 3 1/2" to allow for overlap later. This will ensure that your seam is center on the bottom when you done. Also ensure you leave off an inch at the top so you can attach your bellows to a frame later. I used contact cement at first to glue the spacers but the glue was too stiff and added bulk to the bellows. The best stuff I found for the project is called Tear Mender by Val-A. It is a latex based glue that glues tight, adds no bulk, is waterproof and remains flexible. It also didn't stink up the house nearly as much! Ensure you use enough glue to make the spacer stick but don't use so much that it flows in the space between the spacers. This will just make the bellows bulkier. Once you have the first row done start on the second. Ensure that the angles are complimentary as illustrated to ensure you can put in the folds correctly later. The separation between rows should be minimal. I used a straight edge to align the rows as I glued as well as to ensure that the space between rows was as little as possible. The tip of one spacer should be on the same plane as the tip of the adjacent spacer. You should have about half of your last row of spacer hanging over the edge of the cloth.
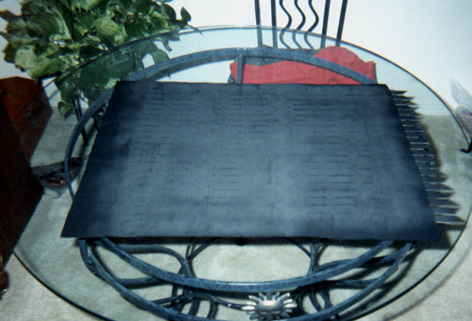
After the spacers are placed and dry you can add a liner to the inside of the bellows. This is not a required step but it can add to the looks and life of your bellows. I used a black gabardine cloth that was thin and light. It won't to the light proofing of the other material you use but it looks nice as a finishing touch. I used a paint brush to lightly coat the inside of the bellows with glue and carefully placed and press the gabardine so there where no wrinkles and the materials had seemed to become one.
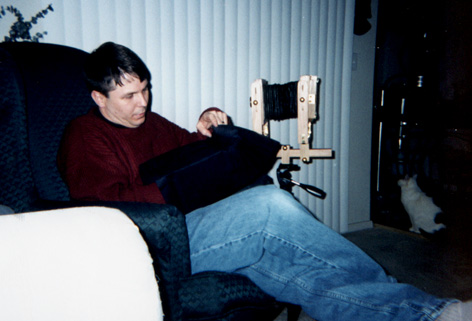
The next bit of fun is the construction of the bellows itself. Ensure that the glue you used is totally dry before proceeding, in fact, I would wait over night. Now, coat the backside of the overhanging spacers with glue and fold your bellows around till the overhanging spacers are properly aligned with the first row you glued on. Press the spacers into the material so that the glue sets properly. You should have about an inch of material that overlaps. You can do one of two things with that overlap. You can fold the overlap under and glue the two ends together. This will create a nice finished edge but will tend to create bulk and limit your camera's movement with the bellows compressed. The option I chose was to leave the end unfinished and just glue the two pieces of material together. It's not as pretty but the bulk is minimized and, well, who ever looks at the bottom of your bellows anyway? Let this step dry thoroughly, again, I would suggest leaving it overnight.
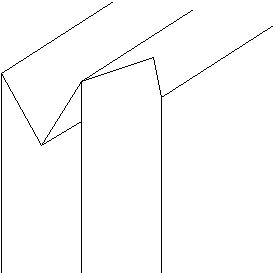
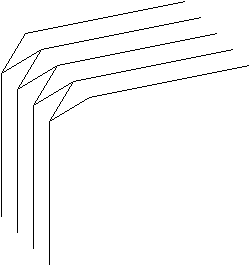
After the bellows dries paint the inside with a good flat black paint. This will ensure you don't have any reflective surfaces on the inside. Once that's dry you can begin the folding. The first couple of folds are the hardest till you get a system down. Alternate your folds and allow the spacers to assist you while folding. Two examples of the folds is below. The first will give you square corners, the second will give you 45° corners. Complete each of your folds completely, ensuring that the corners are sharp, before you move to the next fold. After you have all the folds in you can put on the frame.
Square Cornered Bellows
45° Cornered Bellows
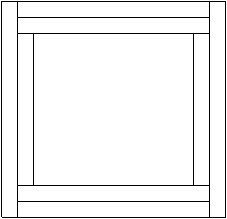
There are many ways to put a frame on your bellows. You can build the frame inside the bellows and attach it permanently to your camera. This is the easiest method. Just cut four pieces of wood, two for the full length of the inside of your camera body, and two shorter by the width of the wood you are using for the frame. Then put in your bellows, then the inside frame and secure it with screws. Easy enough. If you want a frame that allows you to remove the bellows (you might want bag bellows in the future!) then the process is a little harder, but not much. First, cut strips of 1/4" wood to fit snugly inside your camera body. As before, two of these will be the full length of the inside of the body. You can make the width of strips whatever you want to. I made mine flush with the outside edge of the camera body. The next two strips will be the length of the inside of the camera body minus 1/2" so that your outside joint will look like the figure below.
Then cut your inside strips. They will be, again, whatever width you want. Mine were the same width as the first strips. Cut the first two frame pieces to the length of the inside of the outside frame minus the width of the cloth (I fudged it a bit), just ensure that you err to long instead of to short. You can always sand them to length later if needed. Cut the next frame piece the same length minus 1/2" to fit inside as earlier. When you assemble the frame the longest lengths of the inside frame should be against the shortest lengths of the outside frame as illustrated below.
This will give your frame the most stability. When you put everything together use a drill to start some holes and then use screws to hold everything together. I used 4 screws drilled through my camera body, two on the top and two on the bottom, to attach the frame to the body. Make sure you round off the outside edges and corners to assist you with inserting the frame into the body. By using this method I was able make an effective frame and bellows for my camera that I can remove in the field and replace with a bag bellows. Works great! Instead of the simple joint that I've listed you could make you joints miter, box, rabbit, or any other type of joining you can think of. I just found this way to be the easiest. Of course, this technique is great for a straight bellows but I think a graduated bellows like you would use for a 8X10 camera would be just as easy. A little more time consuming as you would have to include the angle from the camera front to the camera back, but not out of the reach of most people. If you have any questions, suggestions or construct techniques, please contact me. |