
|
|
|
|
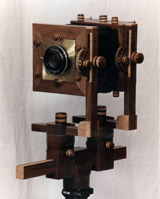
Brass Work The brass is very easy to complete. I couldn't find a ready supply of sheet brass in my area so I went to Home Depot and bought a door kick plate. Make sure it is solid brass since they do make kick plates that are just anodized aluminum. The thickness of the kick plates are perfect for the job requirements and are easy to work. You'll be cutting five pieces from the sheet and I've found that the best cutting tool is a hack saw but I'm sure a band saw with a metal blade would do nicely as well. Also, you will need a good set of files for the shaping and smooth of the pieces. I would suggest a set of jewelers files as well. Lens Board The lens board is a 4 1/8" square that should fit nicely in the rabbet you cut into the front frame earlier. Once the square is cut and trued punch a hole in the exact center so you can mount the lens board to your drill. Of course, this is just for looks and is not a necessary step but once it is mounted on the drill CAREFULLY start up the drill spinning the lens board. Take a block of wood with 300 grit paper wrapped around it and lay it on the lens board holding the block of wood tightly. You can add a little oil to the sandpaper and this will help the sanding. Watch your fingers and be very careful as you sand the brass. This will give you wonderful concentric circles and a great finish to the lens board. Once you are happy with the finish cut a hole in the center to fit the lens you plan on using with the camera. Add a little sticky-backed felt to the inside edge of the lens board so the assembly is light tight and flush with the front of the front frame. You can apply a layer or two of finish to the lens board to keep it from tarnishing if you wish. The lens board is done! Ground Glass Frame Brass and Springs You will need four small pieces of brass First, cut the two pieces for the ground glass frame. The piece for the bottom should be 6" X 1/2" and the top should be 6" X 5/8". You can shape them as you desire. I rounded the corners and added a 5/8" indent into each end about half the width. Whatever works for your design. Once you have them cut, filed to shape and finished you can epoxy them to the ground glass frame. The piece that fits on the bottom should be a bit wider than the wall of the frame. This is OK and will help to set the frame in place. Just make sure that they don't overlap over the inside edge of the frame. Next comes the pieces needed to hold in the ground glass holdbacks. Cut two pieces of brass 1" X 3/4". Use a vice to bend the pieces centerline on the length 45 degrees. Install the ground glass and holdbacks then position the brass to fit. You shouldn't have to do any filing to fit but now would be the time if you do. Once you are happy with the fit and positioning it's time to drill the holes for the 1/8" threaded insert. Install the threaded insert through the pieces you epoxied on earlier. Once you have the knobs made this section, and the brass, is finished. The springs are easy! I made mine out of the windshield wiper replacements found at most automotive stores. Take one of the replacements, separate the parallel pieces of aluminum, pull the rubber blade out from between them and clip the ends to separate the aluminum into two pieces. You now have the springs needed for one camera. Shape the aluminum as seen in the picture above and install. Knobs I'll tell you how I made the knobs for this camera and I'll suggest a couple of alternatives but the knobs are a finishing piece that will be individual to the camera you are building. This design requires 27 knobs of different sizes. I hand turned each on a lathe to size. Remember one rule for this design though, all the knobs that are going through the standards need a good amount of surface area for a good grip. You don't want the camera moving around once you've set your shot! Adjust the size of the knobs to fit your design. Since the knobs I made are layered Walnut and Maple I had to make sure that the glue ups were nice and square. Once the glue dried I installed a 1/8" threaded insert on the small knobs and a 3/8" threaded insert for the large knobs as centered as I could get it. What was more important was getting the insert in straight. The best way to do that on any piece of wood is to use a drill press. Use two nuts on threaded rod then tighten the nuts down on the threaded insert. Install the threaded rod in the drill press and, by hand, use the drill press to thread the insert into the wood you're working with. I then used the threaded rod still attached to the knob in a chuck on the lathe to turn them down. It's as easy as that! Finish I used Tung Oil to finish the camera. I applied six coats using #0000 Steel Wool between each coat. Once the oil has dried thoroughly apply two coats of flat black paint to all the inside surfaces of the camera body. Assemble the camera, do some tests to make sure everything is good to go, and you are done! |

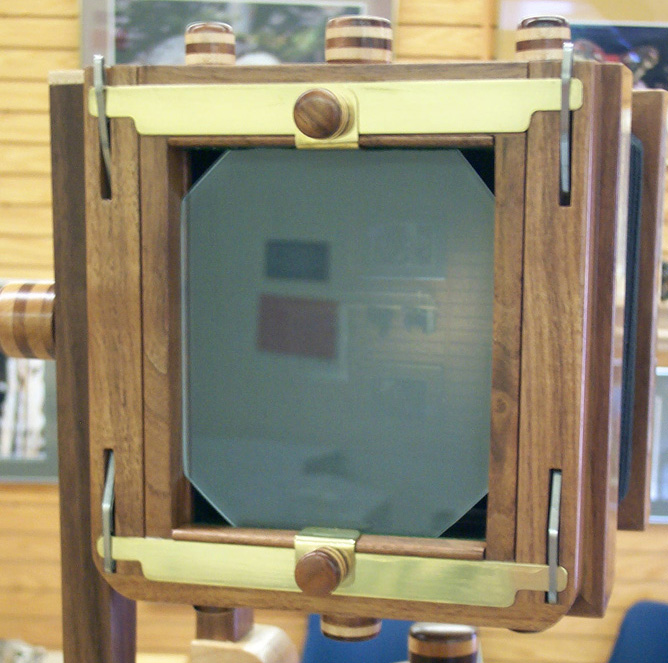 to complete the ground glass frame. Two pieces will hold the ground glass
frame in place and will attach to the springs on the top and bottom. The
other two pieces will hold the ground glass holdbacks in place.
to complete the ground glass frame. Two pieces will hold the ground glass
frame in place and will attach to the springs on the top and bottom. The
other two pieces will hold the ground glass holdbacks in place.